Gain knowledge is all life about !!

This is a great tale which I came across while surfing through the net. Despite being an old story, it highlights the truth of today’s world of programmers.
After reading tell me which one you are ? 🙂 😉

The Parable of the Two Programmers

Once upon a time, unbeknownst to each other, the “Automated Accounting Applications Association” and the “Consolidated Computerized Capital Corporation” decided that they needed the identical program to perform a certain service.

Automated hired a programmer-analyst, Alan, to solve their problem.

Meanwhile, Consolidated decided to ask a newly hired entry-level programmer, Charles, to tackle the job, to see if he was as good as he pretended.

Alan, having had experienced difficult programming projects, decided to use the PQR structured design methodology. With this in mind he asked his department manager to assign another three programmers as a programming team. Then the team went to work, churning out preliminary reports and problem analysis.

Back at consolidated, Charles spend some time thinking about the problem. His fellow employees noticed that Charles often sat with his feet on the desk, drinking coffee. He was occasionally seen at his computer terminal, but his office mate could tell from the rhythmic striking of keys that he was actually playing Space Invaders.

By now, the team at Automated was starting to write code. The programmers were spending about half their time writing and compiling code, and the rest of their time in conference, discussing the interfaces between the various modules.

His office mate noticed that Charles had finally given up on Space Invaders. Instead he now divided his time between drinking coffee with his feet on the table, and scribbling on little scraps of paper. His scribbling didn’t seem to be Tic Tac Toe, but it didn’t exactly make much sense, either.

Two months have gone by. The team at Automated finally releases an implementation timetable. In another two months they will have a test version of the program. Then a two month period of testing and enhancing should yield a completed version.

The manager of Charles has by now tired of seeing him goof off. He decides to confront him. But as he walks into Charles’s office, he is surprised to see Charles busy entering code at his terminal. He decides to postpone the confrontation, so makes some small talk then leaves. However, he begins to keep a closer watch on Charles, so that when the opportunity presents itself he can confront him. Not looking forward to an unpleasant conversation, he is pleased to notice that Charles seems to be busy most of the time. He has even been see to delay his lunch, and to stay after work two or three days a week.

At the end of three months, Charles announces he has completed the project. He submits a 500 line program. The program appears to be clearly written, and when tested it does everything required in the specifications. In fact it even has a few additional convenience features which might significantly improve the usability of the program. The program is put into test, and, except for one quickly corrected oversight, performs well.

The team at Automated has by now completed two of the four major modules required for their program. These modules are now undergoing testing while the other modules are completed.

After another three weeks, Alan announces that the preliminary version is ready one week ahead of schedule. He supplies a list of the deficiencies that he expects to correct. The program is placed under test. The users find a number of bugs and deficiencies, other than those listed. As Alan explains, this is no surprise. After all this is a preliminary version in which bugs were expected.

After about two more months, the team has completed its production version of the program. It consists of about 2,500 lines of code. When tested it seems to satisfy most of the original specifications. It has omitted one or two features, and is very fussy about the format of its input data. However the company decides to install the program. They can always train their data-entry staff to enter data in the strict format required. The program is handed over to some maintenance programmers to eventually incorporate the missing features.

Sequel:

At first Charles’s supervisor was impressed. But as he read through the source code, he realized that the project was really much simpler than he had originally though. It now seemed apparent that this was not much of a challenge even for a beginning programmer.

Charles did produce about 5 lines of code per day. This is perhaps a little above average. However, considering the simplicity of the program, it was nothing exceptional. Also his supervisor remembered his two months of goofing off.

At his next salary review Charles was given a raise which was about half the inflation over the period. He was not given a promotion. After about a year he became discouraged and left Consolidated.

At Automated, Alan was complimented for completing his project on schedule. His supervisor looked over the program. With a few minutes of thumbing through he saw that the company standards about structured programming were being observed. He quickly gave up attempting to read the program however; it seemed quite incomprehensible. He realized by now that the project was really much more complex than he had originally assumed, and he congratulated Alan again on his achievement.

The team had produced over 3 lines of code per programmer per day. This was about average, but, considering the complexity of the problem, could be considered to be exceptional. Alan was given a hefty pay raise, and promoted to Systems Analyst as a reward for his achievement.

March 20, 1985

by Neil W. Rickert (University of Illinois at Chicago).

Linux is a Unix-like computer operating system assembled under the model of free and open source software development and distribution. The defining component of Linux is the Linux kernel, an operating system kernel first released 5 October 1991 by Linus Torvalds.

Linux arguably the most popular open source operating system, has many advantages, one of them is that their internals are open to for all to view. The operating system, once a dark and mysterious area whose code was restricted to a small number of programmers, can now be readily examined, understood, and modified by anybody with the requisite skills. Linux has helped to democratize operating systems.

Linux quickly evolved from a single-person project to a world-wide development project involving thousands of developers.

Without forgetting the goal of this article lets get to the introduction of Linux Kernel and explore its architecture and its various components.

Introduction to the Linux Kernel

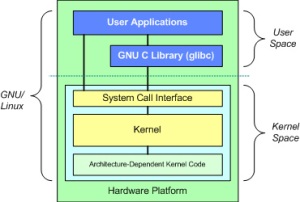
We can think of Linux Kernel architecture to be divided into two levels – User Space and Kernel Space.

At the top is the user space. Below the user space is the kernel space. Here, the Linux kernel exists.

User Space:

This is where the user applications are executed. There is also the GNU C Library (glibc). This provides the system call interface that connects to the kernel and provides the mechanism to transition between the user-space application and the kernel.

Kernel Space:

Here, the Linux Kernel exists which can be further divided into three levels. At the top is the system call interface, which implements the basic functions such as read and write. Below the system call interface is the kernel code, which can be more accurately defined as the architecture-independent kernel code. This code is common to all of the processor architectures supported by Linux. Below this is the architecture-dependent code, which forms what is more commonly called a BSP (Board Support Package). This code serves as the processor and platform-specific code for the given architecture.

Properties of the Linux Kernel

The kernel is layered into a number of distinct subsystems. Linux can also be considered monolithic because it lumps all of the basic services into the kernel. This differs from a microkernel architecture where the kernel provides basic services such as communication, I/O, and memory and process management, and more specific services are plugged in to the microkernel layer.

Functions of the Kernel

Now let’s look at some of the functions of the Linux kernel.

System Call Interface

The SCI is a thin layer that provides the means to perform function calls from user space into the kernel. As discussed previously, this interface can be architecture dependent, even within the same processor family. You can find the SCI implementation in ./linux/kernel, as well as architecture-dependent portions in ./linux/arch.

Process Management

The kernel is in charge of creating and destroying processes and handling their connection to the outside
world (input and output). Communication among different processes (through signals, pipes, or interprocess
communication primitives) is basic to the overall system functionality and is also handled by the kernel. In
addition, the scheduler, which controls how processes share the CPU, is part of process management.

Memory management

Another important resource that’s managed by the kernel is memory. For efficiency, given the way that the hardware manages virtual memory, memory is managed in what are called pages (4KB in size for most architectures). Linux includes the means to manage the available memory, as well as the hardware mechanisms for physical and virtual mappings.

Filesystems

Linux is heavily based on the filesystem concept; almost everything in Linux can be treated as a file. The
kernel builds a structured filesystem on top of unstructured hardware, and the resulting file abstraction is
heavily used throughout the whole system. In addition, Linux supports multiple filesystem types, that is,
different ways of organizing data on the physical medium. For example, disks may be formatted with the
Linux­ standard ext3 filesystem, the commonly used FAT filesystem or several others.

Device control

Almost every system operation eventually maps to a physical device. With the exception of the processor,
memory, and a very few other entities, any and all device control operations are performed by code that is
specific to the device being addressed. That code is called a device driver. The kernel must have embedded
in it a device driver for every peripheral present on a system, from the hard drive to the keyboard and the
tape drive.

Networking

Networking must be managed by the operating system, because most network operations are not specific to
a process: incoming packets are asynchronous events. The packets must be collected, identified, and
dispatched before a process takes care of them. The system is in charge of delivering data packets across
program and network interfaces, and it must control the execution of programs according to their network
activity. Additionally, all the routing and address resolution issues are implemented within the kernel.

Interesting features of the Linux kernel

While much of Linux is independent of the architecture on which it runs, there are elements that must consider the architecture for normal operation and for efficiency. The ./linux/arch subdirectory defines the architecture-dependent portion of the kernel source contained in a number of subdirectories that are specific to the architecture (collectively forming the BSP). For a typical desktop, the i386 directory is used. Each architecture subdirectory contains a number of other subdirectories that focus on a particular aspect of the kernel, such as boot, kernel, memory management, and others. You can find the architecture-dependent code in ./linux/arch.

Even though, Why Linux Kernel ??

If Linux is doing the same thing as other Operating Systems then Why to use it? Why not continue with the existing operating systems.

Linux, being an open source operating system, is a great test bed for new protocols and advancements of those protocols. Linux supports a large number of networking protocols, including the typical TCP/IP, and also extension for high-speed networking. Linux also supports protocols such as the Stream Control Transmission Protocol (SCTP), which provides many advanced features above TCP (as a replacement transport level protocol).

Linux is also a dynamic kernel, supporting the addition and removal of software components on the fly. These are called dynamically loadable kernel modules, and they can be inserted at boot when they’re needed (when a particular device is found requiring the module) or at any time by the user.

Hi friends,

Do you know about the world’s fastest processor? Well, if you don’t know, you can read the following article.

On August 31, an AMD FX processor achieved a frequency of 8.429GHz, a stunning result for a modern, multi-core processor. The record was achieved with several days of preparation and an amazing and inspired run in front of world renowned technology press in Austin, Texas. This frequency bests the prior record of 8.309GHz, and completely blows away any modern desktop processor. The AMD FX CPU is a clock eating monster, temporarily able to withstand extreme conditions to achieve amazing speed. Even with more conservative methods, the AMD FX processors, with multiplier unlocked throughout the range, appear to scale with cold.

Click here to view the video Maximum Speed | AMD FX Processor Takes Guinness World Record !!

So, now AMD’s got the fastest silicon in the west and it’s chipping away at Intel’s processor predominance. What do you think ? Intel must be surely feeling some heat.

Hi,

This article is about shell-scripting which will simplify our Nautilus.

A shell script is a script written for the shell, or command line interpreter, of an operating system. Shell Script is a series of commands written in plain text file. It means shell accept command from you (via keyboard) and execute them. But if you use command one by one (sequence of ‘n’ number of commands) , then you can store this sequence of command to text file and tell the shell to execute this text file instead of entering the commands. This is know as shell script.

Why to Write Shell Script ?

  • Shell script can take input from user, file and output them on screen.
  • Useful to create our own commands.
  • Save lots of time.
  • To automate some task of day today life.
  • System Administration part can be also automated.

Here is a collection of Nautilus scripts which you can use to simplify your Nautilus experience, from simply creating a blank text file, to compressing, to converting, creating, and encoding video etc.
Check it out:

Open up a terminal and enter these commands without quotes –
“cd ~/.gnome2/nautilus-scripts”
“wget http://g-scripts.sourceforge.net/nautilus-scripts.tar.gz”
“tar zxvf nautilus-scripts.tar.gz”
And thats it.
Enjoy these cool scripts !!

Hello guys,

Many of my friends say that after upgrading your Linux Kernel, you don’t find the Grub Menu. The Grub Menu is hidden by default if your system has only one Linux Distro installed. In this article, I will tell you how to unhide Grub Menu.

GNU GRUB (short for GNU GRand Unified Bootloader) is a boot loader package from the GNU Project. GRUB which provides a user the choice to boot one of multiple operating systems installed on a computer or select a specific kernel configuration available on a particular operating system’s partitions.

Unhide/Hide the Menu

Open the file /etc/default/grub in your favorite editor under root’s permission otherwise you wont be able to edit it.

To display the menu:

  • Place a comment symbol (#) at the start of the “GRUB_HIDDEN_TIMEOUT=X” line.
  • Make sure the “DEFAULT_TIMEOUT=X” entry is a positive integer. Xis the number of seconds the menu will be displayed.
    Quote:
    # GRUB_HIDDEN_TIMEOUT=0
    GRUB_HIDDEN_TIMEOUT_QUIET=true
    GRUB_TIMEOUT=”10

Save the file, then update the menu:

“sudo grub-update”

Thats all you have to do.

Reboot your system and you find the grub menu.

Hello guys,

In this article I will tell you about Linux kernel , its related concepts like what is Linux Kernel, why do we need to upgrade and what are its advantages and so on. This article helps those who have Ubuntu installed on their systems.

1. Introduction

The Linux kernel is the operating system kernel used by the Linux family of Unix-like operating systems. It is one of the most prominent examples of free and open source software.

Ubuntu is a computer operating system based on the Linux distribution and distributed as free and open source software, using its own desktop environment. It is named after the Southern African philosophy of ubuntu.

Why upgrade the kernel?

There are several reasons to upgrade the kernel. One is to take advantage of a specific new feature or driver; another is to be protected against a security vulnerability, or just to maintain an up-to-date and healthy system.

So, from time to time it may be wise to upgrade your Linux kernel.

Even if you choose not to update to every new kernel revision, it is recommended that you at least upgrade from time to time. It is strongly recommended that you immediately upgrade to a new kernel if that new release solves a security problem.

Upgrading of kernel

This section will describe upgrading and customizing a new kernel. It isn’t as difficult as you might think!

I have tested this on Ubuntu 11.04 (Natty Narwhal) ,Ubuntu 11.10 (Oneiric Ocelot) and Ubuntu 12.04 LTS (Precise Pangolin).

This goal can be achieved in many other ways, not just in this way. There are many ways of achieving this goal, but I think this will be an easy way.

Note: all the commands below are to be run without quotation marks.

1. Install Required Packages for Kernel Compilation

sudo apt-get install kernel-package libncurses5-dev fakeroot wget bzip2

2. Download the Kernel Source

Go to www.kernel.org and select the latest stable kernel you want to install. Here I am downloading linux-3.3.7.tar.bz2. Download it to “/usr/src”.

Untar the kernel sources and create a symlink linux to the kernel sources directory:

tar xjf linux-3.3.7.tar.bz2
ln -s linux-3.3.7 linux
cd /usr/src/linux”

3. Configuring the kernel

Configuration files are needed for compiling the kernel. You can create your own config file if you know how to do it or use the default one.

For beginners, it’s a good idea to use the configuration of your current working kernel as a basis for your new kernel. Therefore we copy the existing configuration to /usr/src/linux:

“cp /boot/config-`uname -r` ./.config”

Then we run

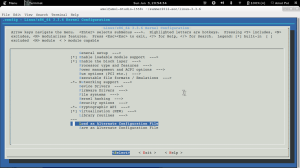
“make menuconfig”

which brings up the kernel configuration menu. Go to Load an Alternate Configuration File and choose .config (which contains the configuration of your current working kernel) as the configuration file:

Then browse through the kernel configuration menu and make your choices. When you are finished and select Exit, answer the following question (Do you wish to save your new kernel configuration?) with Yes:

4. Building the Kernel

To build the kernel, execute these two commands:

“make-kpkg clean
fakeroot make-kpkg –initrd –append-to-version=-custom kernel_image kernel_headers”

Note: ‘custom’ in the above command is the new name given to our new kernel. You can name the kernel as you wish. Just replace word custom by the name you want. This name must begin with a minus (-) and must not contain whitespace.

Kernel compilation can take much time depending on your processor speed and your kernel configuration.

5. Installation of the Kernel

After the successful kernel build, you can find two .deb packages in the /usr/src directory.

“cd /usr/src
ls -l”

On my test system they were called linux-image-3.3.7-custom_3.3.7-custom-10.00.Custom_i386.deb (which contains the actual kernel) and linux-headers-3.3.7-custom_3.3.7-custom-10.00.Custom_i386.deb (which contains files needed if you want to compile additional kernel modules later on). I install them like this:

dpkg -i linux-image-3.3.7-custom_3.3.7-custom-10.00.Custom_i386.deb
dpkg -i linux-headers-3.3.7-custom_3.3.7-custom-10.00.Custom_i386.deb”

That’s it.Now lets change the grub menu.

You can find the menu in /boot/grub/ folder. You find the menu to be modified.

vi /boot/grub/menu.lst”  or “vi /boot/grub/grub.cfg” files.

Now reboot the system:

“shutdown -r now”

If everything goes well, the grub menu will show a new entry for the installed kernel. Select this option. You can check if it’s really using your new kernel by running

“uname -r”

This should display something like

3.3.7-custom

Select your old kernel and start the system. You can now try again to compile a working kernel. Don’t forget to remove the two stanzas of the not-working kernel from /boot/grub/menu.lst or /boot/grub/grub.cfg.

There are many ways to download free movies and music from the Internet. Torrent files are arguably the most popular ways to do it. I know nearly all of you know how to download a torrent. This article will help you optimize your torrent download speed.

But before telling you the steps to optimize your speed let me tell you about Bandwidth Tweaking.

The most important thing to remember is: The speed of your downloads is determined by the speed of your uploads. That’s built into the torrent protocol, and works through what is known as “choking.”

Its like a tit-for-tat-ish algorithm to ensure that people now only download but also upload.
So, if you don’t set up your uploading setting properly, you will be forever choked on your downloads.

So, now lets get to the center point of this article.

Whether running Transmission on Windows, Mac or Linux, there are a number of settings that can be tweaked to improve Transmission BitTorrent download speed. These settings customize the application to work with your computer and Internet connection more efficiently.

Instructions

1. Launch Transmission.
2. Select “Edit > Preferences”
3. Click the “Network” tab.
4. Ensure the port is in the 49152–65534 range.
5. Check “Use UPnP or NAT-PMP port forwarding from my router.”

Setting Speeds

12.Perform a network speed test. You can go to  SpeedTest.net to test your connection.
13. Take note of your upload speed and your download speed.
14. Launch Transmission.
15. Select “Edit > Preferences.”
16. Click the “Speed” tab.
17. Check “Limit Download Speed” and enter a number that is 95% of the download speed reported in your Internet connection speed test.
18. Check “Limit Upload Speed” and enter a number that is is 80% of the upload speed reported in your Internet connection speed test.

Tip –

Beyond simply adjusting Transmission, it is also a good idea to select healthy torrents when downloading. Simply selecting those torrents with the most seeders is not always the best strategy if there are also many leechers. Torrents with a higher ration of seeders to leechers will always be the fastest.

Hello Guys,

Have you ever wondered, How to Login as a root from GUI in Ubuntu 12.04 LTS Precise Pangolin ?
Read Following How to for your answer.

Precise Pangolin

You just need to follow these 5 Steps and you will able to Login as a root From GUI in Ubuntu 12.04 LTS Precise Pangolin.

1) First login as a normal user which you have created during Installation.

2) Open terminal by pressing “Ctrl+Alt+T”

3) Execute Below Command.

sudo passwd root

[sudo] password for sachin: ******

Enter new UNIX password: ******

Retype new UNIX password: ******

4) That’s It. You have successfully Setup Your root user’s password. Now Log out from Current User.

5) Now reboot Ubuntu 12.04 LTS Precise Pangolin, You will see “OTHER”. Click on it ,which asks for Username and Password on Login screen/Window.

Most probably you wont find the other option, so here are the steps to add the other option!

  1. Make sure you have completed the above steps,not press ctrl+alt+T to fire up a new terminal window
  2. Type SU to enter the super user mode, and type the super user password which you specified in the previous steps!
  3. Now type “cp -p /etc/lightdm/lightdm.conf /etc/lightdm/lightdm.conf.orig” without the quotes after the “#” sign!
  4. Again type this after the “#” prompt , “/usr/lib/lightdm/lightdm-set-defaults -m true”
  5. Now when you type this your computer will restart/hang , if this happens just stay cool and restart/disconnect power and switch it on!, now type “/etc/init.d/lightdm restart”!
Now you are all set to go , a new option “LOG IN”  is added to the log in menu, type the username as “root” and your super user password as your password there !
and viola you are ready to go!

It’s very easy howto for Login as a root from GUI ( Ubuntu 12.04 LTS Precise Pangolin )